You probably empty your computer’s recycle bin, wipe down the keyboard every now and then, and dust the screen, but there’s more you should be doing to keep it in tip-top shape. Windows maintenance is vital to keeping your computer from getting slow. We’ve put together some easy ways to keep your PC running quickly and efficiently.
- Running Windows 11?
- Optimize your storage devices
- Free up disk space
- Make sure your computer is malware-free
- Get rid of unused programs and apps
- Remove unnecessary Windows components
- Stop programs from running automatically at startup
- Adjust your graphics settings
- Make sure your OS and drivers are fully updated
- Make sure power options are set correctly
- Upgrade your system
Running Windows 11?
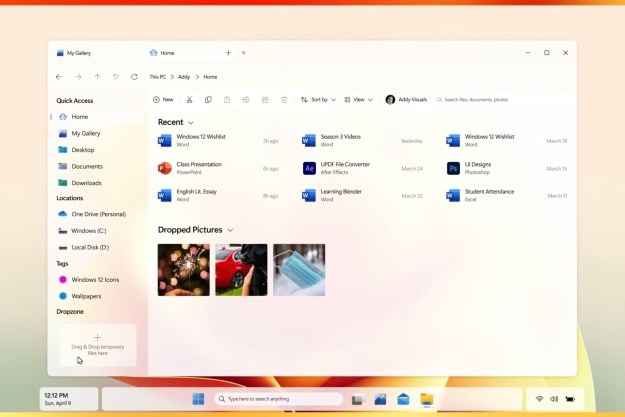
Currently, many users are getting accustomed to Windows 11, its new look, and the updated features that it brings. If you are on Windows 11 or thinking about updating Windows 10 to move to 11, these techniques will still be effective for you. The tools we discuss below are either the same on
Optimize your storage devices
Hard disk drives (HDDs) store files as blocks of data that can be scattered around the platters that make up an HDD. Bigger files equate to more blocks, and as you copy, move, and rearrange files, those data blocks are sometimes organized in an inefficient way. Think of it as a messy office, where you opened files from your cabinet and placed them haphazardly around the room. Your memory is awesome, and so you can find all the papers you need, but you waste time moving around looking for them.
That’s exactly what your HDD does over time, and so in order to keep all your data neatly organized and your system up to speed, it’s best to clean things up on a regular basis through a process known as “defragmentation.” Defragmenting, or defragging, a drive basically moves blocks around so that each file is held in a single location and thus can be retrieved much more quickly.
Solid-state drives (SSDs) don’t suffer the effects of defragmentation because there’s no spinning disk to hunt around to find data, meaning you don’t need to worry about defragging them. In fact, you don’t want to defrag SSDs — they wear out over time, and the process of defragging them will shorten their lifespans. Instead, SSDs have their own optimization technique known as the TRIM command, which can be performed to rid an SSD of any blocks of data that are no longer needed and keep them in peak operating condition. Take a look at the different options for optimizing both types of drives:
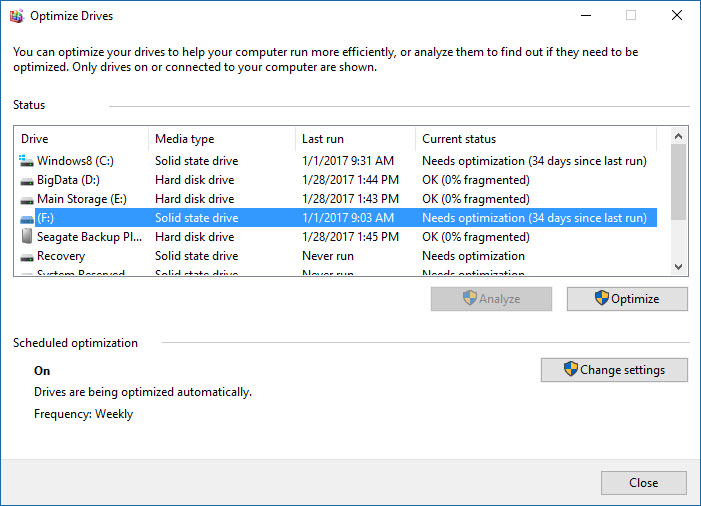
Step 1: Place your cursor in the Windows search box and type “defragment.” Afterward, select Defragment and Optimize Drives from the resulting list to open the Optimize Drives utility.
Step 2: Under Status, tap or click the drive you want to optimize. The Media Type column tells you what type of drive you’re optimizing.
Step 3: To determine if an HDD needs to be optimized, click Analyze. You might be asked for an admin password or to confirm your choice. Note that the Analyze button will be disabled for SSDs.
Step 4: After Windows is finished analyzing the HDD, check the Current Status column to see whether you need to optimize the drive. If an HDD is more than 10% fragmented, you should optimize the drive now. If an SSD hasn’t been optimized in the past 30 days, you should also consider optimizing it.
Step 5: Tap or click Optimize for the desired drives. You might be asked for an admin password or to confirm your choice. Note that “optimize” means to defrag HDDs and to run the TRIM command on SSDs. Optimizing a drive might take anywhere from several minutes to a few hours to finish, depending on the size of the drive and degree of optimization needed. However, you can still use your PC during the optimization process.
Step 6: You can also schedule defragmentation by clicking on Change Settings under Schedule Optimization. Check the Run On a Schedule (Recommended) box, then set the frequency and whether you want to be notified if three consecutive scheduled runs are missed. Click Choose to select which drives to include and if you want to automatically schedule new disks. If you see an SSD listed, make sure it’s not included.
Step 7: Click OK. Now, Windows will optimize your drives according to the established schedule and keep your system plugging away.
Free up disk space
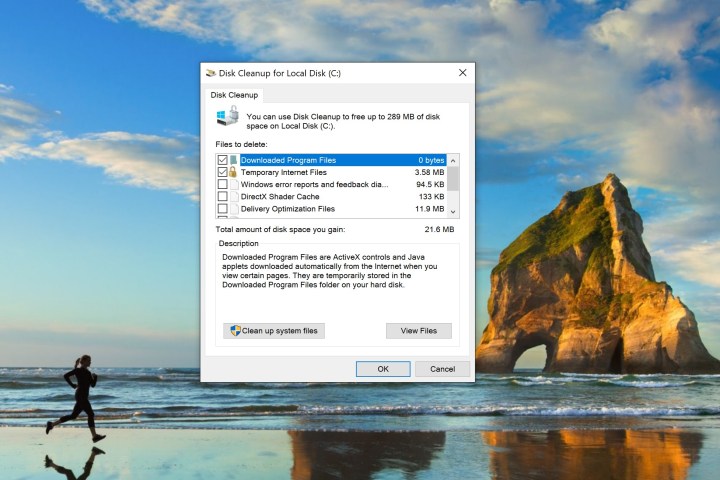
Your storage devices can accumulate plenty of unnecessary junk over time, but Windows offers a Disk Cleanup tool that makes tidying up a snap. This feature can be used to remove temporary files like cookies and installation files, empty the recycle bin and browser cache, and get rid of a variety of system files and other items. Here’s how to use it:
Step 1: Place your cursor in the Windows search box, type “disk cleanup,” and then select Disk Cleanup from the resulting list to open the utility.
Step 2: If the Disk Cleanup: Drive Selection dialog box appears, select the hard disk drive that you want to clean up, and then click OK.
Step 3: If you want to see system files as well, then click the Clean Up System Files button. This will show files that the system might use — such as service pack backup files — that can save space but might have to be installed again at some point in the future. If you’re prompted for an administrator password or confirmation, type the password or provide confirmation.
Step 4: Select the checkboxes for the files you want to delete.
Step 5: When you finish selecting the files you want to delete, click OK, and then click Delete Files to confirm your decision. Disk Cleanup will then proceed to remove all unnecessary files from your computer.
Make sure your computer is malware-free
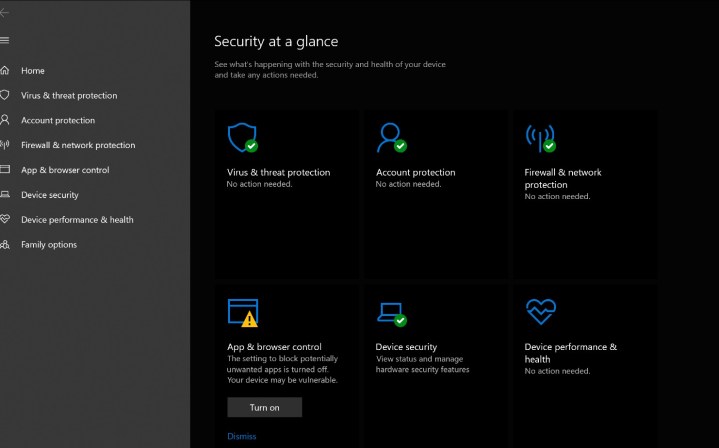
If you don’t already have one installed, we suggest using one of these great free antivirus apps to rid your system of unwanted malware. However, you can also use Microsoft’s built-in virus scanner, Windows Security, to locate and remove malicious software.
Search for “Windows Security” in the Windows search box, and select it from the list, which will give you copious information on the overall health of your Windows 10 PC. Windows Security should be running automatically, and you can run a quick scan at any time to make sure you’re in good shape.
Get rid of unused programs and apps
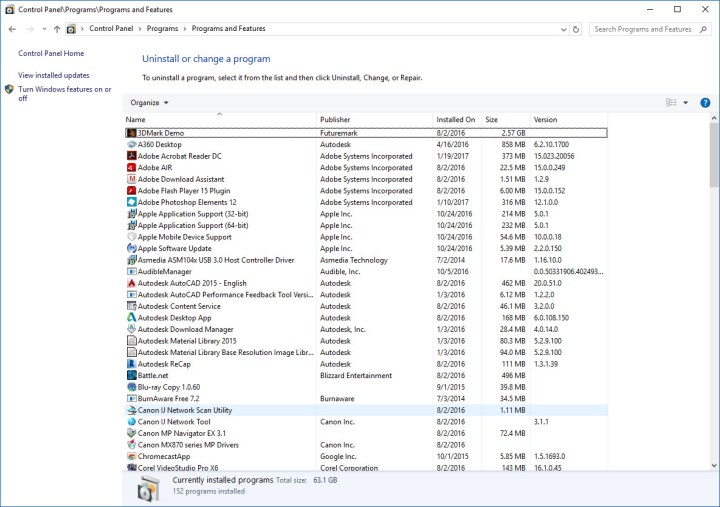
As a general rule, a clean machine is a fast machine, and so there’s no good reason to keep any programs and apps you don’t use. For optimal performance, delete any trial or limited-edition software, along with anything else you’re never going to use. This is the only way to ensure unneeded applications aren’t running processes in the background that take up processor time. To uninstall programs, search for “Control Panel,” then choose Programs > Program Features to get to the uninstall tools. Then just click on the program you want to uninstall and choose the Uninstall option.
Here’s how to uninstall apps:
Step 1: Right-click the Start button, then click Settings.
Step 2: Click Apps, then click on the app you want to uninstall.
Step 3: Click Uninstall.
Step 4: Follow any instructions, which can vary by application.
Remove unnecessary Windows components
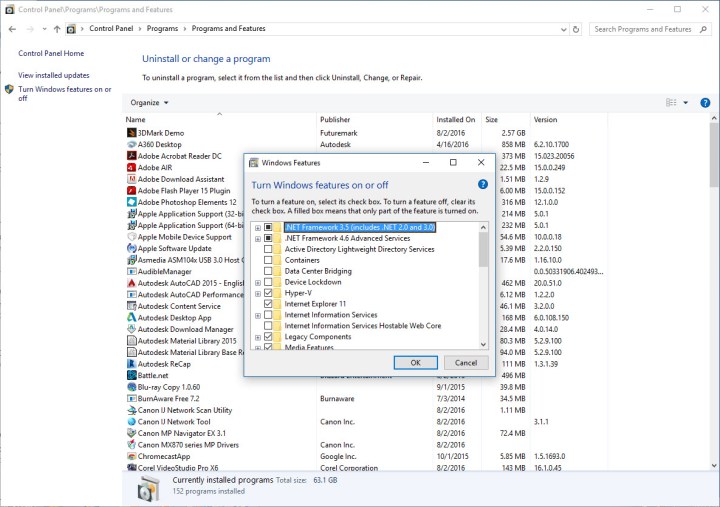
Windows has a number of components that aren’t needed for all users, such as Internet Information Services for hosting websites and Hyper-V in Windows 10 for running virtual machines. This is another area where you’ll want to be careful to avoid turning something off that might be needed. If they aren’t needed, though, why not get rid of them? Here’s how to turn off unneeded Windows features:
Step 1: Use the search box to look for “Control Panel.”
Step 2: Under Programs, click Uninstall a Program.
Step 3: Select Turn Windows Features On and Off on the left-hand side of the window. If you’re prompted for an administrator password or confirmation, type the password or provide confirmation.
Step 4: Uncheck any Windows features that you don’t need, and hit OK.
Step 5: You will likely get a dialog asking you to reboot your PC to finish implementing the changes. To reboot your computer immediately, click Restart Now. To reboot later, click Don’t Restart.
Stop programs from running automatically at startup
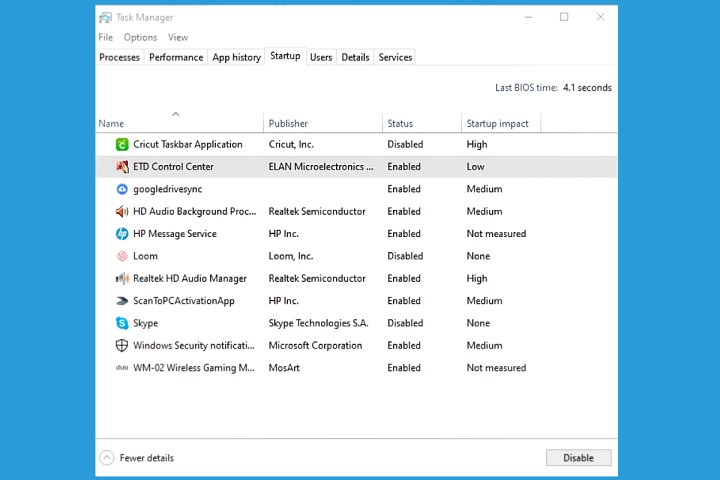
Some applications will start when Windows boots up and run processes that you don’t really need. You don’t have to allow that, however — it’s easy to control which applications automatically start with Windows. Of course, you’ll want to be sure to do some research first to make sure you’re not turning off a component that you might actually need. Once you’re sure you know what you want to turn off, using Task Manager, you can improve your PC’s performance by preventing unnecessary apps from running automatically when Windows starts.
Step 1: Right-click the Start button, and then click Task Manager.
Step 2: Tap or click the Startup tab. If you don’t see any tabs, tap or click More Details.
Step 3: Tap or click the name of the app you want to disable, and then tap or click Disable.
Adjust your graphics settings
Windows uses a number of graphical enhancements to show what’s going on with the operating system. Things like animations and flyouts add some flair and visual feedback, but they also suck down processor and GPU (graphics processing unit) cycles and can make tasks seem like they’re taking longer to complete. Turning them off can help speed up a system that’s running very slowly and allow you to get your work done more efficiently. Here’s how:
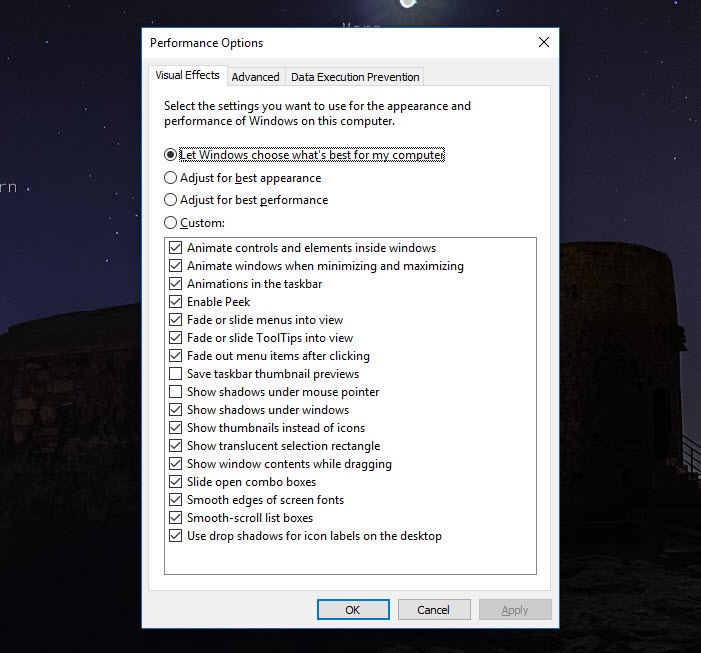
Step 1: Place your cursor in the search box, type “performance,” and then select Adjust the Appearance and Performance of Windows.
Step 2: Make sure the Visual Effects tab is selected. Here, you can decide if you want to let Windows choose what’s best for your computer, adjust for the best appearance, or adjust for the best performance. If you’re desperately in need of a speed boost, we recommend checking the latter.
Step 3: To take control of the visual effects that Windows provides, select Custom. Then, go through the list of options and uncheck any visual effects that you want to turn off. Click Apply, then OK if you like the changes.
Make sure your OS and drivers are fully updated
Microsoft and peripheral makers regularly provide the operating system and driver updates that can improve performance. While updates might be configured to automatically run in the background, it doesn’t hurt to check to make sure that the latest and greatest software is installed. Some peripherals, such as GPUs, might be updated by using manufacturer-provided utilities like Nvidia’s GeForce Experience app. In these cases, you’ll want to refer to those utilities first.
Here are some instructions on how to check to make sure that the OS and driver updates controlled by Windows are applied:
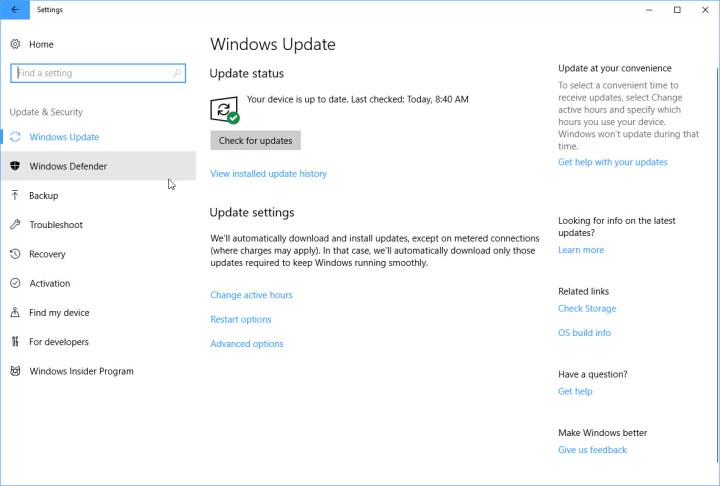
Step 1: Place your cursor in the search box, type “update,” and then select Check for Updates.
Step 2: Click the Check for Updates button.
Step 3: Windows will check for updates and then download and install any that are available.
Step 4: Click the Restart button, if necessary, to restart your PC and install any updates that need a restart to apply. Then, follow any on-screen instructions while the updates are being installed.
Make sure power options are set correctly
Windows has the ability to adjust a variety of system settings to balance performance against things like battery life and how aggressively a PC’s cooling system works to keep heat under control. Thankfully, you can gain some control over your PC’s power settings to make sure that performance is being optimized, and if top performance is your primary objective, you can turn off most power-saving settings in favor of faster operations.
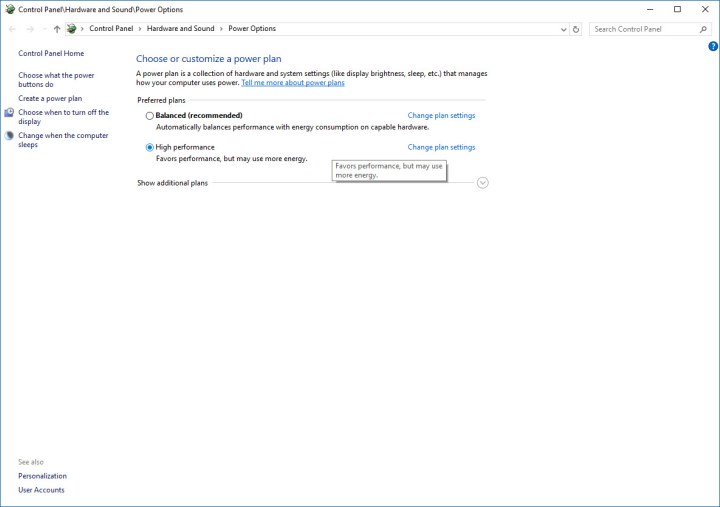
Step 1: Type “power plan” in the search bar and select Choose a Power Plan.
Step 2: Depending on your system and whether you’ve adjusted your power plans in the past, you’ll see a list of plans under Preferred Plans. You’re looking for the High-Performance plan, and if you don’t see it, then click on Show Additional Plans.
Note: Some PCs don’t have a high-performance option.
Step 3: Select High Performance. This will adjust various settings to favor performance over battery life, meaning that if you’re using a notebook, it’s going to run for less time without being plugged in.
Step 4: To gain more control over power settings, select Change Plan Settings, and click Change Advanced Power Settings. Afterward, make sure High Performance (Active) is selected in the drop-down menu. You will be presented with a number of settings that you can adjust based on your given PC.
Note: On Windows 11, changing your battery life settings looks a little different. For one thing, you no longer have access to the little power slider by clicking on your battery icon. If you can’t find your power plan using our steps above, we suggest searching for “power and battery” in the Windows search box, which should take you to the appropriate section for managing
Upgrade your system
We can’t guarantee that these tips will make your system run quickly enough to run today’s applications and operating systems. Before you go out and buy a brand-new PC, however, consider making a few hardware upgrades. Here are a few relatively easy and low-cost upgrades that can greatly extend a PC’s lifespan.
If you can upgrade your computer’s RAM, then that can be one of the easiest and least expensive ways to improve performance. This is particularly true if your PC has less than 4GB of RAM. If your system already has 4GB of RAM, then you’ll benefit from an upgrade to 8GB if you keep many applications open at once, run your browser with a huge number of tabs, or work with extremely large images and video files. An upgrade to beyond 8GB will be valuable for anyone working with ultra-large video files or doing 3D drafting or other demanding work.
If your PC uses an HDD and you can swap it, then one of the most significant speed boosts you can achieve is by switching to an SSD. In terms of both reading and writing data, SSDs are significantly faster than HDDs. Some retail SSD kits come with hardware and software to make it easy to clone your existing operating system configuration from your HDD to the new SSD. This saves you the trouble of having to reinstall your operating system, applications, and files, and you can repurpose the HDD as a storage-only drive.
The GPU is rarely upgradeable in notebook PCs. However, your desktop PC might be a good candidate for a newer GPU, which will be of interest mainly to gamers. However, if you do image or video editing on your PC, then a new GPU can help performance there as well. Here’s our list of the best graphic cards for 2020.
While there’s no guarantee that you’ll be able to clean up and reconfigure an older system and make it run sufficiently enough for today’s applications, following the steps above can at least help you make sure you’re squeezing as much life out of your PC as possible. If none of these steps make a difference, then perhaps it’s time to make the switch to a new system.
Editors' Recommendations
- How much RAM do you need?
- Common Windows 11 problems and how to fix them
- ChatGPT can now generate working Windows 11 keys for free
- Windows 11 is about to make RGB peripherals way easier to use
- Will Windows AI Copilot be the ultimate PC accessibility tool?

